Showing posts with label no bake. Show all posts

Sunday, 11 August 2013

Honeycomb Crunchies


I found the recipe for these in a Good Food magazine I was reading at my mother-in-laws house last week during a few days holiday back home in Devon. I liked the look of them and found the recipe on line on the BBC website which you can find here (it's a Mary Berry one from the Great British Bake Off for Comic Relief). I've never made honeycomb before and was a little apprehensive to say the least. I didn't fancy ruining any of our saucepans! It was actually surprisingly easy especially as I received a sugar thermometer in the post yesterday as a birthday present (thanks Dot and Martin!) which would help with getting the mixture to the right temperature. They have a crunchy texture and my husband has just given them his seal of approval so I would definitely recommend.

Some tips on making the honeycomb...
There are lots of different recipes around online for making honeycomb including a Nigella Lawson one (she calls hers Hokey Pokey). The most useful one I found was a blog post by Ruth Clemens (of Great British Bake Off fame) which you can read here. If you don't follow or read her blog 'The Pink Whisk' I would highly recommend checking it out. Ruth takes you through the process step by step. The most useful pieces of advice I found were to use a cardboard box to set your honeycomb (the cardboard allows it to cool more quickly) and to make sure you use a good quality silicone coated baking paper rather than greaseproof paper (I used Tesco's). Also make sure that when you pour your honeycomb into your box you don't use a spoon or spatula as this will knock the air out of it and you will lose the bubbles. A final word of advice - make sure you soak your pan quickly as otherwise you will end up with honeycomb stuck to your saucepan. If you do get any bits left over, boil a kettle and pour this over and you should be able to remove any stubborn bits.

Ingredients


For the honeycomb
1 tsp bicarboante of soda
75g caster sugar
2 tbsp golden syrup

To assemble
250g dark or milk chocolate, or a mixture (I used dark)
100g unsalted butter
2 tbsp golden syrup
150g digestive biscuits

Method
1) Begin by preparing your cereal box (you can use a shoe box or cereal packet - I used a cereal packet). Cut off one of the large sides and tape together the corners to make sure it holds together. Line it with a double layer of non-stick baking paper, making sure you have a good overhang along the long edges.


2) Measure and sieve the bicarbonate of soda into a dish ready for when you will need it. Make sure you have a wire whisk ready as well. Put the sugar and golden syrup into a saucepan and set it on a very low heat. Warm gently ready for 10 minutes until all the sugar has melted, stirring occasionally with a wooden spoon. (I found I needed to add a couple of tablespoons of water to help the sugar melt). You'll know when it's dissolved as you won't be able to feel the grains of sugar in the bottom of the pan with your spoon.
3) When the sugar is completely melted, turn the heat up to medium. Once the mixture has started to boil, leave to bubble without stirring. If your using a sugar thermometer the mixture needs to reach 145C - if you're not you will need to leave it for around 10 minutes until it turns golden-brown.
4) Turn off the heat under the pan. Add the bicarbonate of soda and quickly whisk it in for a couple of seconds until it is fully incorporated. The mixture will froth up - take care as it is extremely hot!
5) Quickly pour it into the middle of your lined cardboard box. Don't touch it or spread it out on the tray. Leave it to cool and harden, which will take about 30 minutes.


6) Line a square 20.5cm tin with baking paper. Break the chocolate into small pieces. Put them in a heatproof bowl and add the butter and golden syrup. Melt gently, over a pan of hot water, stirring it occasionally. When the chocolate mixture is smooth, carefully lift the bowl of the pan and place on a heatproof surface.
7) Put the biscuits into a plastic food bag and use the rolling pic to break them up into chunks the size of your thumbnail. (We didn't have any food bags so I put the biscuits in a bowl). Break the honeycomb into chunks roughly the same size (I found a rolling pin didn't really work so did this by hand).


8) Add the biscuits and honeycomb to the melted chocolate and mix well so all the chunks are coated.


9) Scoop the mixture into your lined tine and spread it evenly, right into the corners. Cover with cling film, then chill in the fridge for about two hours, or until firm and set.


 10) Cut into 16 squares with a sharp knife. Store, tightly covered, in the fridge and eat within two days.


Enjoy! Happy baking! 


Sunday, 7 July 2013

Banoffee Pie


Summer has finally arrived and it is barbecue season. Our friends Simon and Louisa (and their super cute son Finn) joined us this afternoon for a barbecue in the sunshine and to cheer Andy Murray on (well done Andy!) I was tempted to make Nigella's Forgotten Pudding or her Strawberry Shortcakes but Mr Birdie requested banoffee pie so banoffee pie it was!

There are hundreds of recipes for banoffee pie on the Internet. After much perusing I opted for a Hairy Biker's recipe from the BBC website which you can find here. I made some changes such as not putting banana in the cream on top and not putting any banana on the top. It is a simple recipe and it is super tasty. After a few baking disasters recently I was happy to get back on track and enjoy some baking success!

Ingredients:


For the base and sides
75g butter
300g oaty biscuits (the recipe states chocolate oaty biscuits but I decided to use plain)
For the filling
115g butter
115g soft dark brown sugar (I didn't have any and used light brown instead - it didn't make any difference other than the colour of the caramel)
397g can sweetened condensed milk

For the topping
450ml double cream
4 ripe but firm medium bananas (I ended up using 3 large ones as I didn't put any on the top or in the cream)
25g coarsely grated plain dark chocolate or chocolate curls

Method:
1) To make the base, melt the butter in a small pan. Break the biscuits into chunky pieces, put in a food processor and blend into crumbs. Alternatively you can put the biscuits into a strong food bag and bash with a rolling pin. Tip into a bowl and stir in the melted butter.
2) Tip the crumbs into the centre of a deep, 23cm/9in fluted loose-base tart tin and press firmly into the base and sides (I didn't have one large enough so used a 23cm springform tin which worked just as well). Make sure the biscuit is evenly distributed and chill in the fridge for 30 minutes, or until set.


3)To make the filling, melt the butter in a medium non-stick saucepan and stir in the sugar. Cook over a low heat as the sugar dissolve, stirring constantly until the butter and sugar look smooth and no oil floats to the surface. Add the condensed milk and bring to a gentle simmer, stirring constantly. Cook until the mixture turns a deep, creamy caramel brown (You need to be very paitent - the recipe states this will take three minutes but mine took a lot longer than this).


4) Pour the toffee gently onto the biscuit base and quickly smooth the surface. Leave to chill for at least one hour (I left mine overnight) before topping.

5) Just before serving, lightly whip the cream in a bowl. It should stand in soft peaks. Diagonally slice the bananas and scatter them over the toffee. (The recipe suggests putting half the bananas on top of the toffee and folding the rest into the cream but I decided against this).


6) Spoon the cream gently on top. If you want to decorate your pie with banana on top the recipe suggests slicing some banana and pouring lemon juice over it to stop it from going brown. You can then decorate the top with the lemony banana, poking it into the cream randomly. Finally, sprinkle the pie with grated chocolate or chocolate curls. 


7) To serve cut into slices and enjoy!


Sunday, 23 June 2013

Rocky Road


As a teacher the summer term is normally my favourite time of year. Sunshine, sports days, less stress, the count down to the summer holidays. Unfortunately it's not quite working out like that at the moment. It's been a busy few weeks so I thought I whip up a batch of rocky road to keep us all going. I also made some banana muffins but these were an EPIC failure (both in looks and taste) so I'm not even going to post them (yes, they really were that bad!)

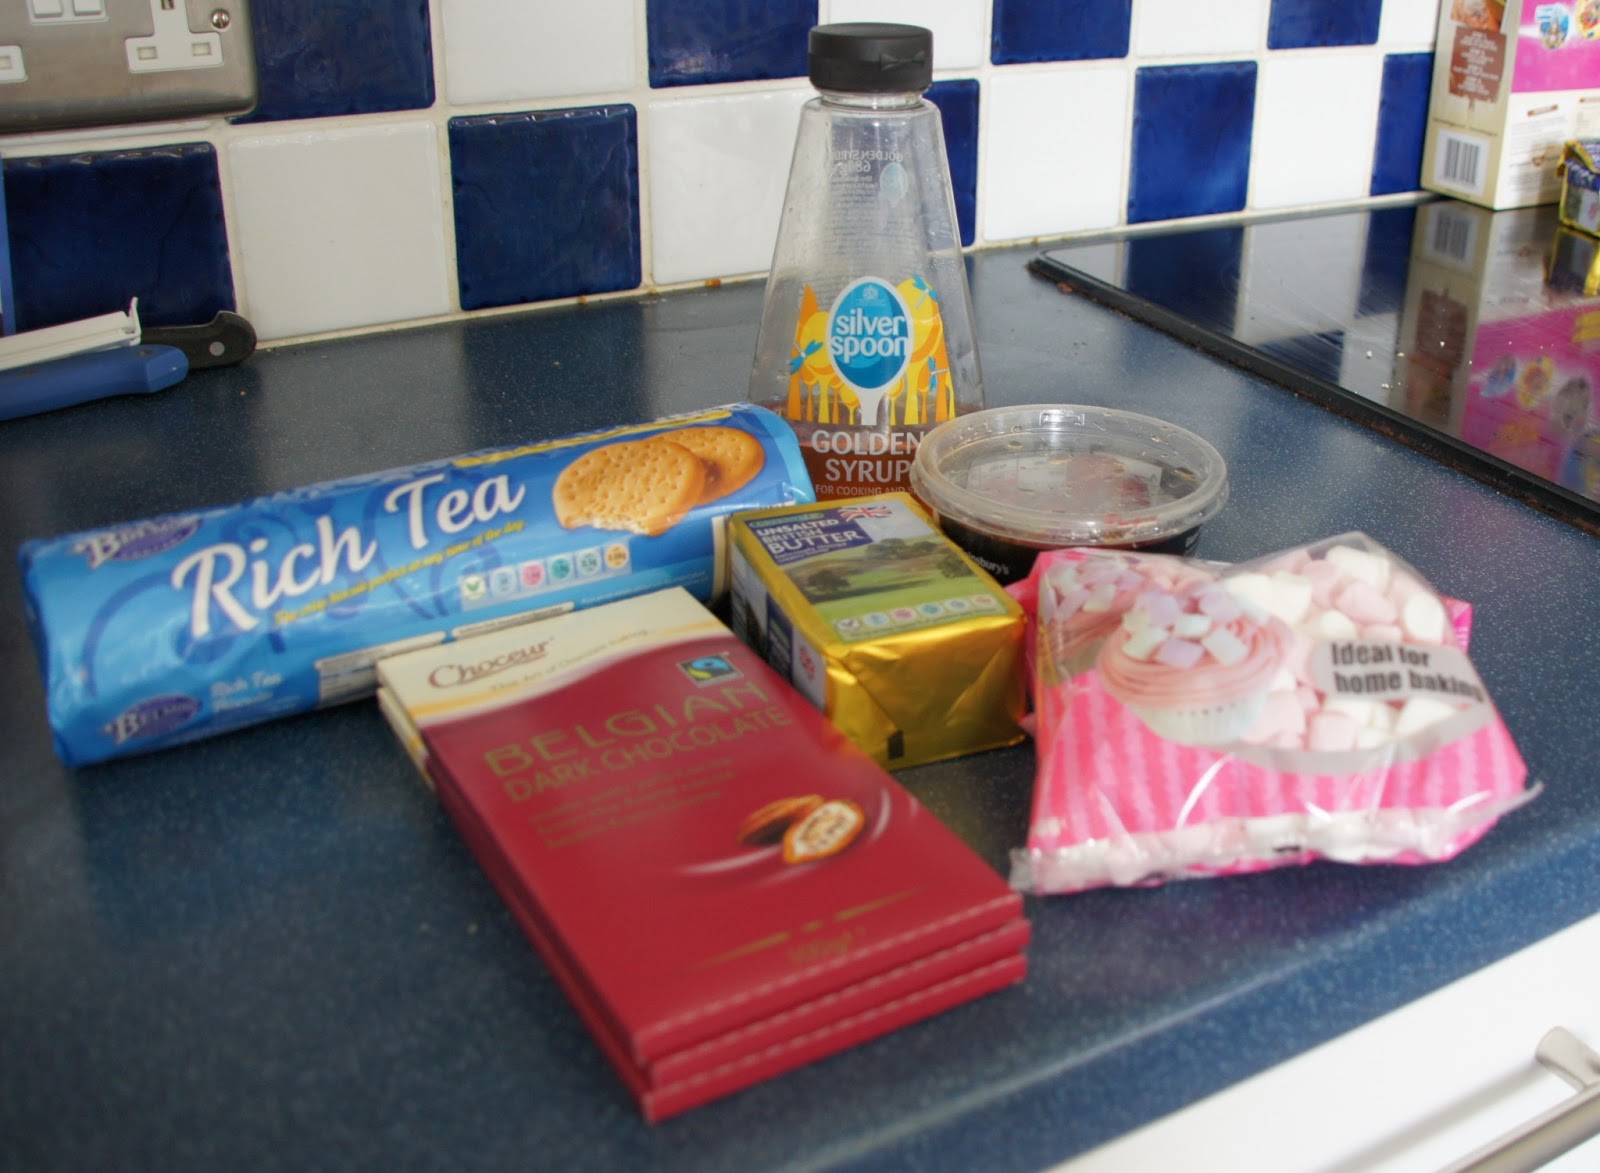
My introduction to rocky road came about 6 years ago when I used to work with a teacher who made THE most amazing cakes. She would make a batch of rocky road which she'd bring in and they would be gone in minutes. We were pretty much obsessed with them in the staff room and they were always requested. This was my first attempt and I think future attempts will need a little refining. The beauty of it is that it requires no baking. When you look at recipes on the Internet you will find all sorts of different versions with different ingredients. The combinations and possibilities are endless. Do you go for rich tea biscuits or digestives? Milk chocolate, dark chocolate or both? Fruit or no fruit? Nuts or no nuts? I opted for a simple Nigella recipe from the BBC website that you can find here. There is also a Christmas version as well. I decided to add some glace cherries as I had some that needed using up - Mr Birdie was not keen on these and has advised me that in future raisins would be a better addition (this has been noted!)

Ingredients:


125g unsalted soft butter
300g dark chocolate, broken into pieces
3 tbsp golden syrup
200g rich tea biscuits
100g mini marshmallows
150g glace cherries (optional extra)
2 tsp icing sugar, to dust

Method:
1) Heat the butter, chocolate and golden syrup in a heavy-based saucepan over a gentle heat.


Once melted, remove from the heat, scoop out about 125ml of the melted mixture and set aside in a bowl/jug.
2) Place the biscuits into a freezer bag and crush them with a rolling pin until some have turned to crumbs but there are still some pieces of biscuits remaining (this can be very therapeutic!)
3) Fold the biscuit pieces and crumbs into the melted chocolate mixture in the saucepan, then add the marshmallows and the cherries.


4) Tip the mixture into a 24cm/9in square baking tin and smooth the top with a wet spatula.


5) Pour over the reserved 125ml of the melted chocolate mixture and smooth again.


6) Refrigerate for about two hours or overnight.
7) To serve, cut into 24 gingers and dust with icing sugar and enjoy!