Wednesday 31 July 2013

Chocolate Chip Cookies


Teachers around Great Britain are rejoicing - why? It's the holidays! That makes me happy as it means more time for baking! One of my bestest friends Rachael has just had a gorgeous baby boy so I thought the family may be in need of some sugary, chocolaty goodness to keep them all going so I decided chocolate chip cookies were most definitely needed!

This is a Hummingbird Bakery recipe from The Hummingbird Bakery Cookbook. It's the same book that the oat and raisin cookies that I've previously featured come from. This recipe makes 24 cookies.

Ingredients


225g unsalted butter (at room temperature)
350g soft light brown sugar
2 eggs
1/2 teaspoon vanilla extact
400g plain flour
1/2 teaspoon salt
2 1/2 teaspoons bicarbonate of soda
225g dark chocolate (roughly chopped)

Method
1) Preheat the oven to 170C/325F/Gas 3 and line 4 baking sheets with greaseproof paper.
2) Put the butter and sugars in a large bowl and mix (using an electric handwhisk - alternatively use a freestanding electric mixer) until light and fluffy. Add the eggs one at a time, mixing well and scraping any unmixed ingredients from the side with a rubber spatula. Add the vanilla extract and mix on the lowest speed until combined.


3) Add the flour, salt and bicarbonate of soda and mix well until a smooth dough is formed.


4) Roughly chop the chocolate and stir into the dough mixture until it is evenly dispersed.


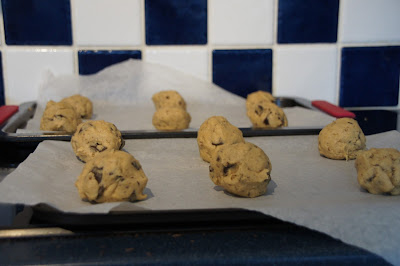
5) Arrange six equal amounts of cookie dough onto each prepared baking tray. Make sure that there is enough space for the cookies to spread while baking.


6) Bake in the preheated oven for about 15 minutes until the cookies are golden brown around the edges (the recipe states 10 minutes but I actually found mine needed 15). Leave the cookies to cool slightly on the trays before transferring the cookies on the greaseproof paper to a wire cooling rack to cool completely (A word of warning - do not try removing the cookies from the paper until they have completely cooled as otherwise melted chocolate chunks and large amounts of cookies will come away with the paper too!)
7) Enjoy your soft and chewy cookie with the drink of your choice (as I am doing now whilst writing this!)


Happy baking!
A savoury twist - Cheese straws and Tomato & Gruyere whirls


I'm not normally a savoury baker - I much prefer sugary, chocolaty treats that are crowd pleasers. However, last Saturday I organised a baby shower for my lovely friend Emma who is expecting a bundle of joy very soon. This called for some savoury snacks. I decided to make cheese straws and tomato and Gruyere whirls. I had made the tomato and Gruyere whirls last year for my 30th birthday afternoon tea and everyone had enjoyed them so decided these would be a good bet. Cheese straws were an entirely new adventure for me! The tomato and Gruyere whirls are super easy and require nothing other than assembling (unless you are feeling brave and want to make your own puff pastry - something I am not quite ready for!)

Both of these recipes come from a Sainsbury's cooking book I was given as an end of year present by an ex-pupil. I used to bombard them with tales of my cupcake making an even bring baking into my Maths lessons so I was really touched to receive it. It's called 'Baking Recipe Collection' by Sainsbury's and is out of stock on the Sainsbury's website but it you look on Amazon you can find second hand copies starting from the bargainous price of 1p (plus postage and packing). I've decided to combine the two into one post.

Cheese Straws

Ingredients


125g unsalted butter
250g plain flour
Mustard powder (pinch of)
50g grated Cheddar cheese
50g grated Red Leicester cheese
2 eggs (1 egg yolk and 1 to beat) 
Poppy seeds and sesame seeds to decorate

Method
1) Preheat the oven to 200C/Fan 180C/Gas 6.
2) Rub the butter into the plain flour until you have a mixture that resembles breadcrumbs. 


3) Stir in a pinch of mustard powder and the grated Cheddar and Red Leicester cheese.


4) Add the egg yolk and a little water and mix into a firm dough. Make sure you add the water a little at a time. You should end up with something that looks like this...


5) On a floured board, roll out the pastry into a large rectangle. Cut into straws about 3/4cm thick (I found getting the width right most difficult - I had some very fat cheese straws!) Brush with beaten egg and dip in poppy seeds or sesame seeds.
6) Bake on a non-stick tray for 15-20 minutes until golden and crisp.


Tomato and Gruyere Whirls 

Ingredients 


375g ready-rolled puff pastry
150g tomato chutney (I used Sainsbury's Taste the Difference Tomato and Red Pepper Chutney)
100g Gruyere cheese (grated)

Method
1) Unroll the puff pastry and spread with the tomato chutney. Top with the grated Gruyere cheese.


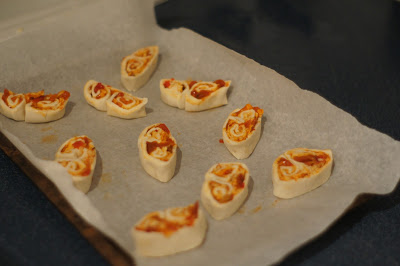
2) Tightly roll up one longer side to the middle. Repeat with the other long edge, to meet in the middle. (It is important that you roll these as tight as possible as otherwise they will ping apart as I found out the first time I made these last year. You will also lose the 'whirl' effect.)


3) Wrap in clingfilm and chill in a fridge for 30 minutes. Preheat the oven to 200C/Fan 180C/Gas 6 (handily the same temperature as the cheese straws!)
4) Cut the pastry into 1cm slices and place on a baking tray lined with baking parchment (the cheese will bubble and the chutney will ooze so lining is important!)


5) Bake for 15 minutes and then cool on a wire rack. (I forgot to take any photos - oops! They were very popular. To quote Emma 'I don't even like pastry but I like these!'

Happy savoury baking!


Monday 22 July 2013

Marbled Millionaires Shortbread


As the summer term comes to an end in schools across the country, attention turns to the members of staff leaving for pastures new. We have two amazing ladies leaving us and so are holding a tea party to celebrate their many years of service - so of course I had to offer my baking services!

Tray bakes were the order of the day so after my successful banoffee pie I decided I would try another caramel-based adventure - marbled millionaires shortbread. Not ideal in this baking hot weather but a classic favourite and hopefully a safer bet than cupcakes (icing in this weather - not a good idea!)

I used a combination of a Nigella recipe from 'How To Be A Domestic Goddess' and a recipe from the Carnation website which you can find here. The Nigella recipe said to use a 23cm tin and the Carnation recipe a 20cm tin but I used a 21cm and it seemed to be ok.

They were a big hit - it's just a shame they didn't survive the weather particularly well - squidgy millionaires shortbread is never nice! If you're making them in our current heatwave make sure you keep them in your fridge.

Ingredients:


Shortbread:
225g plain flour
75g caster sugar
175g unsalted  butter

Caramel: 
150g butter
150g dark brown soft sugar (I still don't have any so used light brown)
397g can condensed sweetened milk

Chocolate topping:
200g milk chocolate
55g white chocolate

Method:
1) Preheat the oven 170C/Gas mark 3. Put the flour and sugar into a bowl and rub the butter into it, clumping the dough together to form a bowl. Press this mixture into a lined and greased 23cm brownie tin an smooth it with your hands or a spatula. Prick it with a fork and cook for 5 minutes, then lower the oven to 150C/Gas mark 2, and cook for a further 30-40 minutes until it is pale golden and no longer doughy. Let it cool in the tin.


2) Once it is cooled you can make the caramel. Heat the sugar and butter in a non-stick pan gently, until melted. Add the condensed milk and bring to a rapid boil, stirring continuously. Remember to be patient at this point. Cook until it has thickened. Pour over the based and then cool and chill until set.
3) Melt the chocolate in separate bowls. Pour the milk chocolate over the caramel and then add spoonfuls of the melted white chocolate. Swirl together with a spoon for a marbled effect. (This is where I had some issues - it took me three attempts to melt my white chocolate by which time the milk chocolate had started to set so my marbling didn't really work.)


4) Once set, cut the shortbread into pieces - they can be kept in a fridge in an airtight container for up to 2 weeks (if they last that long!) Enjoy!


Sunday 7 July 2013

Banoffee Pie


Summer has finally arrived and it is barbecue season. Our friends Simon and Louisa (and their super cute son Finn) joined us this afternoon for a barbecue in the sunshine and to cheer Andy Murray on (well done Andy!) I was tempted to make Nigella's Forgotten Pudding or her Strawberry Shortcakes but Mr Birdie requested banoffee pie so banoffee pie it was!

There are hundreds of recipes for banoffee pie on the Internet. After much perusing I opted for a Hairy Biker's recipe from the BBC website which you can find here. I made some changes such as not putting banana in the cream on top and not putting any banana on the top. It is a simple recipe and it is super tasty. After a few baking disasters recently I was happy to get back on track and enjoy some baking success!

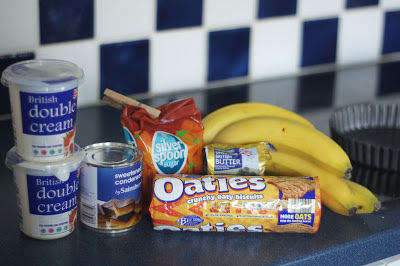
Ingredients:


For the base and sides
75g butter
300g oaty biscuits (the recipe states chocolate oaty biscuits but I decided to use plain)
For the filling
115g butter
115g soft dark brown sugar (I didn't have any and used light brown instead - it didn't make any difference other than the colour of the caramel)
397g can sweetened condensed milk

For the topping
450ml double cream
4 ripe but firm medium bananas (I ended up using 3 large ones as I didn't put any on the top or in the cream)
25g coarsely grated plain dark chocolate or chocolate curls

Method:
1) To make the base, melt the butter in a small pan. Break the biscuits into chunky pieces, put in a food processor and blend into crumbs. Alternatively you can put the biscuits into a strong food bag and bash with a rolling pin. Tip into a bowl and stir in the melted butter.
2) Tip the crumbs into the centre of a deep, 23cm/9in fluted loose-base tart tin and press firmly into the base and sides (I didn't have one large enough so used a 23cm springform tin which worked just as well). Make sure the biscuit is evenly distributed and chill in the fridge for 30 minutes, or until set.


3)To make the filling, melt the butter in a medium non-stick saucepan and stir in the sugar. Cook over a low heat as the sugar dissolve, stirring constantly until the butter and sugar look smooth and no oil floats to the surface. Add the condensed milk and bring to a gentle simmer, stirring constantly. Cook until the mixture turns a deep, creamy caramel brown (You need to be very paitent - the recipe states this will take three minutes but mine took a lot longer than this).


4) Pour the toffee gently onto the biscuit base and quickly smooth the surface. Leave to chill for at least one hour (I left mine overnight) before topping.

5) Just before serving, lightly whip the cream in a bowl. It should stand in soft peaks. Diagonally slice the bananas and scatter them over the toffee. (The recipe suggests putting half the bananas on top of the toffee and folding the rest into the cream but I decided against this).


6) Spoon the cream gently on top. If you want to decorate your pie with banana on top the recipe suggests slicing some banana and pouring lemon juice over it to stop it from going brown. You can then decorate the top with the lemony banana, poking it into the cream randomly. Finally, sprinkle the pie with grated chocolate or chocolate curls. 


7) To serve cut into slices and enjoy!