This cake was meant to be an entry for a John Whaite Book Club competition (and also dessert for a gathering with some of my teacher friends) but as you will discover if you read on, it ended up in no fit state to be photographed...
There were many lessons I learnt when making this cake...
1) Always use the correct size cake tins - if it says 20cm it means 20cm! Sadly I don't own any 20cm tins. I own 18.5cm tins and 23cm tins. I opted for the 23cm tins thinking this would be better but sadly not! I ended up with large almost flat sponges.
2) Check your self-raising flour is in date Mine was best before June which I think may have contributed towards my flat sponges.
3) If it says the ganache filling will take a long time to thicken it means it will take a long time to thicken.
4) If your judgement is telling you not to try to assemble the cake don't do it! I thought about taking the sponges and ganache separately and assembling it when needed but stupidly thought it would be ok. It wasn't - the ganache wasn't thick enough and spilled out everywhere. The cake started to slip and slide around in my car and due to some unexpected breaking ended up in pieces. It was essentially a cake jigsaw puzzle that I had to arrange into something resembling a cake when I arrived at my friends house. Luckily I have some lovely friends who said it still looked delicious :-)
I wasn't going to post this but actually it was a big hit and when it was sliced into pieces it didn't actually look too bad (if you looked at it in a creative way!) and a blog post was requested by my friends. Sadly I only had my phone with me so the pictures of the end result aren't great. If you are brave enough to attempt this (and not as silly as me and don't make the same mistakes I did) you can find the recipe here on John Whaite's Facebook page.
Ingredients
For the sponge
200g unsalted butter (At room temperature, cut into cubes)
100g white chocolate (Broken into pieces)
4 eggs
200g caster sugar
200g self-raising flour
175g fresh raspberries
Icing sugar (For dusting)
For the ganache filling
200g white chocolate (Broken into pieces)
250ml double cream
Method
1) Preheat the oven to 180C/Gas 4. Grease and base-line two 20cm (8in) round loose-bottomed cake tins.
2) Put the butter and chocolate in a large heatproof mixing bowl above a pan of barely simemring water and allow them to melt and meld together slowly, stirring occasionally. Remove from the heat and set aside to cool for a minute or so (the mixture will look a bit strange as the second photo shows but don't worry).
3) When the melted butter and chocolate have cooled, add the eggs and sugar and beat with an electric mixer until you have a smooth and consistent batter (This takes a minute or two. To begin with you will think it is never going to create a smooth batter but have faith - it will come together!) Sift the flour over the bowl and fold that in, along with the fresh raspberries.
4) Gently pour into the prepared cake tins, dividing equally between them.
5) Bake for 20-25 minutes (or until golden brown and a skewer inserted into the centre comes out clean). Remember to switch the tins halfway through baking if you are not baking them on the same shelf. Allow to cool completely.
6) To make the ganache, put the chocolate into a heatproof bowl with 100ml of the cream. Set over a pan of barely simmering water and stir until the chocolate has melted into the cream and you are left with a smooth, glossy ganache. Leave to cool to room temperature, then beat in the rest of the cream. It takes a long time for the ganache to cool and thicken, so you will need to be patient! (Something like several hours...)
7) When the cakes have cooled, sandwich them together - the lower one base-side down, the upper one inverted, so that you have a smooth top and bottom - with the white chocolate ganache. Dust with icing sugar, just before serving.
Happy baking (and good luck!)
Saturday 31 August 2013
Friday 30 August 2013
Double Chocolate Shortbreads
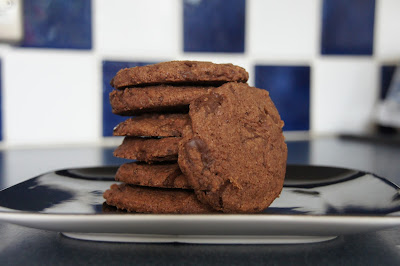
Now these are supposedly meant to be shortbreads...however I would disagree. The texture is more of a crumbly biscuit rather than a buttery, moreish shortbread. They are perfectly tasty (although perhaps lacking in depth of flavour) and the perfect accompaniment to a cup of coffee while catching up with a friend (as I discovered today when I managed to scoff three of them - oops!) but do not embark upon making them thinking that you will create traditional shortbread.
I made these as I was visiting one of my friends who is allergic to egg - shortbread seemed to be the perfect option. I considered lemon, chocolate chip and espresso choc chip but found this BBC Good Food recipe which seemed easy enough to whip up quickly this morning. I managed to make 20 biscuits from the mixture.
Ingredients
175g butter (softened)
85g golden caster sugar
200g plain flour
2 tablespoons cocoa powder
100g chocolate chips (milk or dark - I used 100g of dark chocolate that I chopped into small bits)
Method
1) Mix the butter and sugar together with a wooden spoon. Stir in the flour and cocoa, followed by the chocolate chips (you might need to mix it together with your hands at this stage - I didn't).
2) Halve the dough and roll each piece into a log about 5cm thick. Wrap in cling film and chill for 1 hour or for several days (It can be frozen for up to 1 month).
3) Heat the oven to 180C/160C/Gas 4. Slice the logs into 1cm-thick rounds, transfer to a baking tray lined with baking parchment and bake for 10-12 minutes. Cool on the tray.
Happy baking!
Sunday 25 August 2013
Chocolate brownie meringue cake
Today was a special day. You might have seen 'The Big Reunion' on the TV (lots of pop bands from the late nineties and early noughties reuniting) - well today was the proper big reunion. It is ten years this summer since I and my very special friends graduated from university. In honour of this special occasion we had a get together to reminisce, laugh over photos (what were we wearing?!?) and partake in a game of petanque. I of course offered to make dessert. I'd had my eye on this recipe for a while and recently had a similar cake at 'The Tenth Hole Tea Rooms' in Southsea (they are legendary in Hampshire for their amazing cakes!) so decided now was the time. I am now a little bit obsessed with the idea of making meringue cakes and have my eye on a Nigella Lawson lemon meringue cake, a BBC Good Food blackberry and almond meringue cake and a mocha meringue cake I have found on a blog. Oh the possibilities!
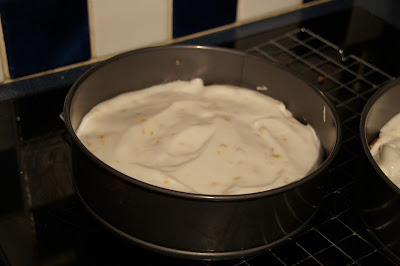
As you will see from the photos I have yet again failed in my attempts to make a meringue that does not crack! I am obviously just doomed. However despite appearances the cake went down well. It is a Miranda Gore-Brown recipe from the Great British Bake Off. You can find it on lots of different websites but I used the version from the BBC website that you can find here. It is very tricky to slice and serve and does not look pretty but makes up for it in taste. The combination of meringue and brownie works well and the raspberry cream adds some freshness. There was a debate over the hazelnuts in the meringue but the end decision was that they add texture. The recipe is meant to use two 23cm sandwich tins which I don't possess so I used springform tins instead which still works.
Ingredients:
For the brownie base
200g good-quality dark chocolate (roughly chopped)
200g unsalted butter, softened (plus extra for greasing)
250g icing sugar
3 eggs
110g plain flour
For the meringue topping
4 egg whites
200g caster sugar
1/2 teaspoon cream of tartar
100g hazelnuts (roasted and chopped)
For the filling
300ml whipping cream
100g icing sugar
200g raspberries
Method:
1) Preheat the oven to 190C/375F/Gas 5. Grease and line two 23cm sandwich tins.
2) For the brownie base, melt 180g of the chocolate in a bowl and set over a pan of simmering water. Chop the remaining chocolate and set aside.
 |
| Melt 180g of chocolate |
 |
| Roughly chop the remaining chocolate |
 |
| Cream the butter and sugar until fluffy and creamy |
 |
| Add the eggs one at a time |
5) Pour the brownie mixture into the prepared sandwich tins and bake for 10-12 minutes. Reduce the oven temperature to 170C/325F/Gas 3.
6) Meanwhile for the meringue topping, whisk the egg whites and cream of tartar in a bowl until soft peaks form when the whisk is removed (I think I probably stopped whisking a little bit too early and should have carried on a little longer). Slowly which the sugar until smooth and glossy, then fold in the chopped hazelnuts with a metal spoon.
7) Spoon the meringue topping onto the cooked brownie base. Use a palette knife to smooth the meringue mixture in one sandwich tin and use a skewer to make peaks in the meringue mixture in the other tin (I failed here as I don't think I whisked my meringue enough for the peaks to hold).
8) Return the sandwich tins to the overn for a further 30 minutes, or until the meringue is golden-brown (I check mine just after 20 minutes and they were ready then.) Remove from the oven and set aside to cool. Carefully remove the cakes from the tin and set aside to cool completely on a wire rack.
9) For the filling, whip the cream and icing sugar together in a bowl until stiff peaks form when the whisk is removed (again I think I failed in my whisking here!) Fold in the raspberries.
 |
| Whisk the cream and icing sugar until stiff peaks form |
Happy baking!
Thursday 22 August 2013
Blackberry and apple crumble muffins
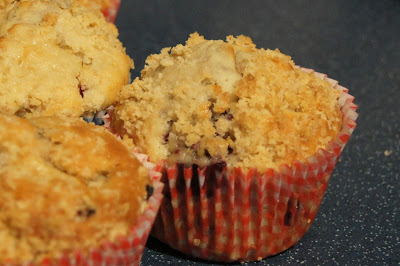
The recipe works well and produces muffins that are moist. I particularly like the bursts of bright purple created by the blackberries. If I was to make these again I would cut the chunks of apple a little smaller and possibly use a dessert apple instead to add a little more sweetness.
The recipe makes 12 muffins and you will need a 12-hole muffin tin lined with paper cases.
Ingredients:
300g plain flour
1 tbsp baking powder
Pinch of salt
190g caster sugar
210ml milk
1 large egg (beaten)
100g butter (melted)
Zest of 1 large lemon (finely grated)
1 large Bramley apple
150g blackberries
For the crumble topping
15g butter (at room temperature)
25g plain flour
15g demerara sugar
Method:
1) Preheat the oven to 200C/Fan 180C/Gas 6 and line a 12-hole muffin tray with paper muffin cases.
2) First make the crumble topping. Rub the butter into the flour until it resembles fine breadcrumbs.
 |
| Rub in the butter |
 |
| Stir in the sugar |
 |
| Mix together the dry ingredients |
 |
| Beat together the wet ingredients and lemon zest |
5) Stir the wet mixture into the flour and sugar mixture until combined (it's fine if it's still a bit lumpy). Stir in the apple and blackberries.
6) Spoon the mixture evenly into the paper muffin cases and sprinkle over the crumble topping.
7) Bake for 20-25 minutes until risen and golden. Cool for 5 minutes and preferably serve warm (and maybe with a dollop of custard or cream if you're feeling decadent?)
Happy baking (and blackberry picking!)
Dil :-)
Sunday 18 August 2013
Chocolate Chip Cookies - Take Two
You may be wondering why I am writing about chocolate chip cookies again? Well, I am someone who likes to try different recipes even if I have found one that already works perfectly well. Today I decided to try Jo Wheatley's recipe for chocolate chip cookies that feature in her 'A Passion for Baking Book'. They are different to the Hummingbird Bakery ones I have made recently - although this isn't a bad thing. I can't describe exactly how they are different other than I think they have a more biscuity texture rather than a cookie (although this may be down to me getting the sugar quantities horrifically wrong and if I'm being really truthful probably baking them for a couple of minutes too much). They will be winging their way to our friends Emma and John, who have just become parents for the first time to the gorgeous Leo. I thought they might need some sugar and chocolate!
I managed to make 14 cookies (although as you will read later this is probably because I mistakenly upped the amount of demerara sugar by nearly double the amount - oops!)
Ingredients
200g unsalted butter (softened)
200g light soft brown sugar
125g demerara sugar
2 large eggs (beaten)
1 teaspoon vanilla extract
400g plain flour
1 teaspoon baking powder
1 teaspoon bicarbonate of soda
salt (a pinch of)
200g dark chocolate (roughly chopped)
Method
1) Preheat the oven to 170C/325F/Gas 3 and line 4 baking sheets with greaseproof paper.
2) Put the butter and sugars in a large bowl and mix (using an electric handwhisk - alternatively use a freestanding electric mixer) until light and fluffy (this is where I mistakenly added 200g of demerara sugar rather than 125g - oops! It didn't seem to have too much of an ill effect.)
 |
| Whisk until pale, light and fluffy |
4) Sift the flour, baking powder, bicarbonate of soda and a pinch of salt into the bowl and mix again until thoroughly combined.
 |
| Add the dry ingredients |
 |
| Fold the chopped chocolate into the cookie dough |
7) Bake the batches in batches on the middle shelf of the preheated oven for about 5 minutes. Remove from the oven and sharply bang the baking trays on the work surface to deflate the cookies, then return to the oven for a further 10 minutes until pale golden brown.
8) Allow the cookies to cool on the baking trays for a few minutes before transferring to wire racks until cold.
9) Enjoy with a drink of your choice (alternatively I think they'd be delicious served warm with ice cream!)
Subscribe to:
Posts (Atom)
