Sunday 23 February 2014

Apple Crumble Cupcakes


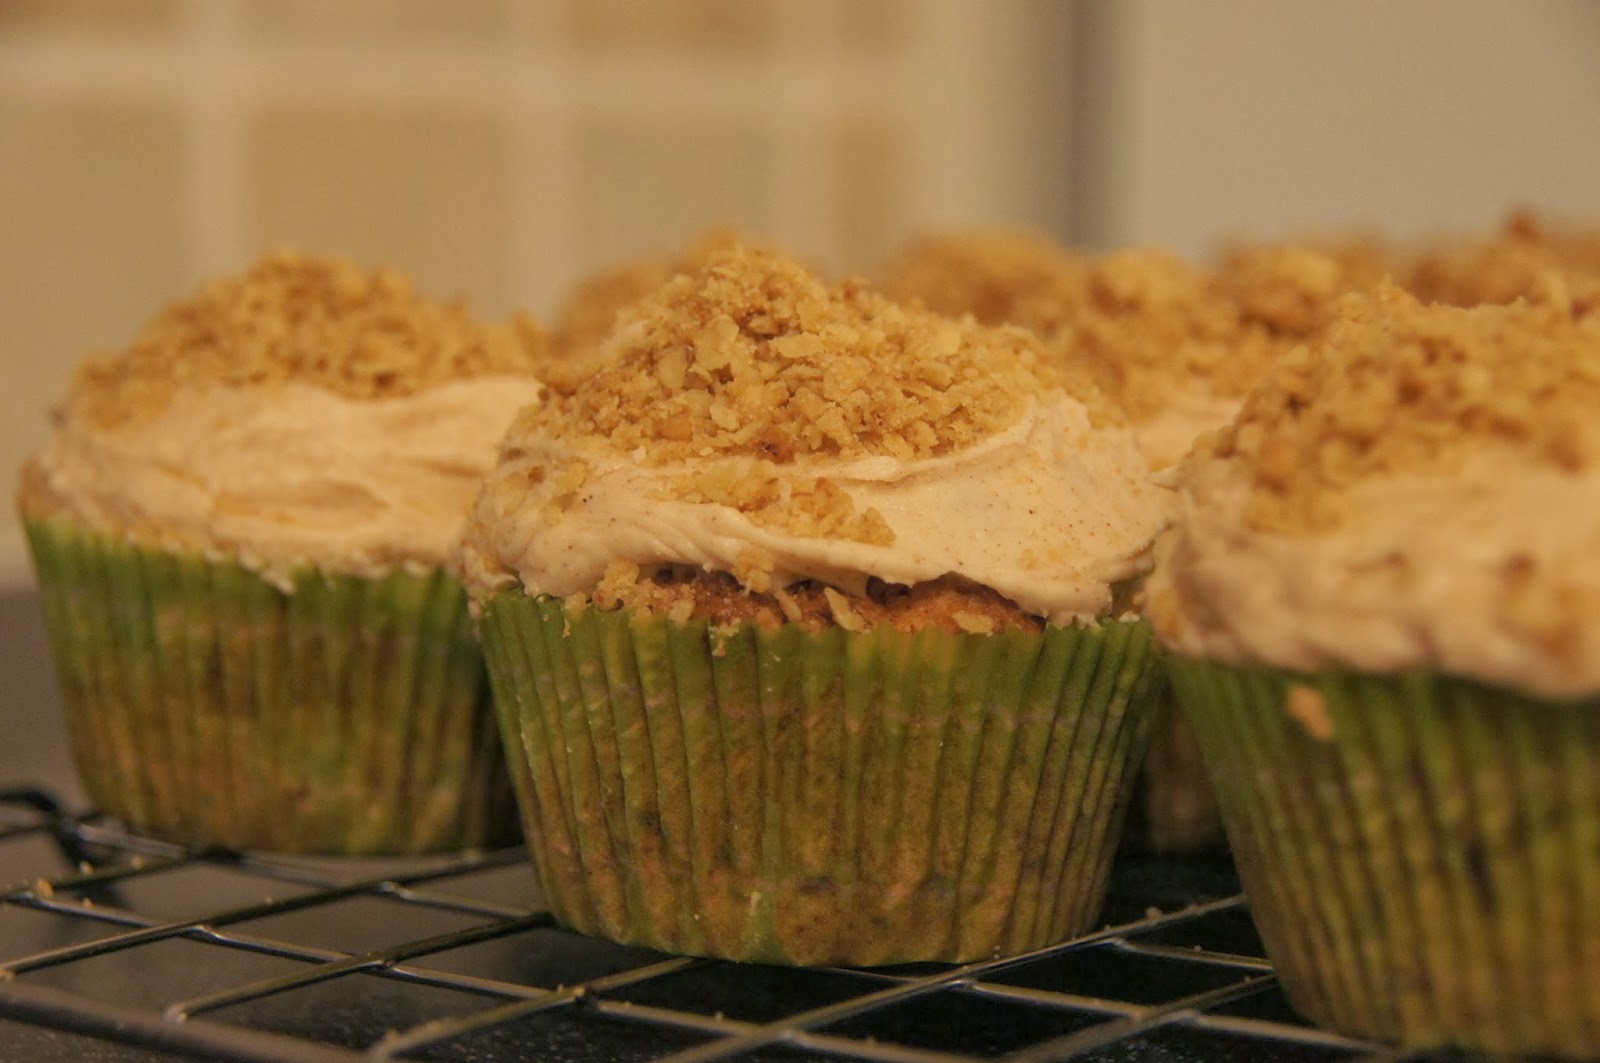
It' has been ages since I made cupcakes. I have mentioned before that Mr Birdie likes to joke that cupcakes are all I make - well hopefully this blog has proved him wrong! I made these once before and Mr Birdie declared them 'the best cupcakes I'd ever made'! I decided to make these as I had a couple of Bramley apples that needed using up.

These cupcakes are a combination of recipes - the cupcake recipe is from Eric Lanlard's Cox, Cookies & Cake book and the cream cheese frosting and crumble topping come from the Cup O' Sugar blog. If I had had lots of time I would have filled them with custard as my Dad gave me a cupcake filler gadget for Christmas that I am still waiting to try out but sadly time flew by today. I made 18 cupcakes from the mixture but this will probably depend on how much apple mixture you make.

Ingredients:


For the cupcakes:
2 cooking apples (peeled, cored and chopped - you may want to use 3 to ensure you have enough)
1 teaspoon ground cinnamon
1/2 teaspoon bicarbonate of soda
100g butter (softened)
200g soft brown sugar
2 eggs
350g self-raising flour

For the cream cheese frosting:
4 tablespoons butter (60g)
4 cups icing sugar
1/4 teaspoon vanilla extract
6oz cream cheese (approx. 1 packet)
2 teaspoons ground cinnamon

For the crumble topping:
55g plain flour
55g rolled oats
Pinch of cinnamon
55g butter
40g soft light brown sugar

Method:
1) Preheat your oven to 200C/180C Fan/Gas 6 and line a cupcake tin with paper cases.
2) Put the apples in a saucepan with the cinnamon and cook over a gentle heat until mushy. (This will take a long time - the first time I made these I added some water but didn't this time. You will need to keep stirring it regularly to make sure the mixture doesn't catch on the bottom of the saucepan. The original recipe says to strain the mixture after it's cooked and to then weigh out 250g but I only had 100g without straining it which is why you might want to try 3 apples instead.)


3) In a bowl, mix the bicarbonate of soda into the apples.


4) In a separate large bowl, cream the butter and sugar together. Once these are combined add the eggs.


5) Alternately fold the self-raising flour and apple mixture into the butter mixture and mix well (the mixture will be quite thick - although it may be looser if you use the correct amount of apple.) 


6) Divide between the paper cases and bake for 20-25 minutes until the cupcakes are golden brown and a skewer inserted into the centre of a cupcake comes out clean (mine took 20 minutes.) Leave them to cool in the tins for 5 minutes before transferring to a wire rack to cool completely. 


7) Once the cupcakes have cooled make the cream cheese frosting. Place all the ingredients in a bowl and mix with an electric whisk until well-combined. Frost the cupcakes with a knife (you can alternatively use a frosting bag with a nozzle but I think they look better rustic.)


8) To make the crumble topping mix the flour, oats and cinnamon in a bowl. Then add the butter and rub in using your fingertips until all the ingredients come together in a crumble-like consistency. Then add the sugar making sure it is evenly mixed in.


Spread the crumble mix on a paper-lined baking tray and bake in the oven for about 15 minutes until golden brown. You will need to gently stir the mixture to ensure it browns evenly (I checked mine every 5 minutes and found it needed about 20 minutes.) Once the crumbs are golden, remove from the oven and set aside to cool. 


9) To finish the cupcakes sprinkle the crumble topping onto the cream cheese frosting and enjoy (with cream or custard if you're feeling extra indulgent!)


Chocolate & Pear Torte


Our friends Simon & Louisa came round for lunch today (accompanied by their super cute son Finn). Following on from my carrot cake post where I was using up some carrots I was given at work I also had some pears that needed using. I decided to opt for Jo Wheatley's Chocolate & Pear Torte from her 'Home Baking' book. You can find the recipe online here. I had considered this BBC Good Food flourless chocolate and pear cake and this BBC Good Food squidgy pear and hazelnut spread cake but I find Jo's recipes easy to follow and that they produce good results.

This torte will serve 8-10. You will need a 25cm springform or loose-bottomed cake tin that you have lightly greased.

Ingredients:


For the syrup:
250ml water
60g caster sugar
peel of half an orange

For the cake:
3 small dessert pears (peeled, cored & quartered - mine were very small so I used 4)
300g good-quality dark chocolate (roughly chopped)
250g unsalted butter
4 large eggs (separated)
100g caster sugar
200g ground almonds
Pinch of sea salt
1 teaspoon vanilla extract or paste

Method:
1) Preheat your oven to 170C/325F/Gas 3. Lightly grease your cake tin.
2) Put the water, caster sugar and orange peel in a saucepan and bring to the boil (stirring to dissolve the sugar). Add the pears, cover the pan with a lid and simmer for 5-10 minutes until just softened (this will depend on the ripeness of your pears).


3) After the pears have cooked, remove them from the saucepan using a slotted spoon. Leave them to cool. Continue to cook the poaching liquid (with the lid off) until has reduced by half and is thick and syrupy. Set aside.


4) Melt the chocolate and butter together in a heatproof bowl over a pan of barely simmering water. Stir until smooth and remove from the heat.


5) Whisk the egg whites until they reach stiff peaks.


6) In a separate bowl, whisk the yolks and sugar together until pale, light and fluffy. Using a metal spoon fold in the almonds, salt and vanilla (I was worried at this point as the mixture became very thick but don't worry - just try not to knock too much of the air out of it.)


7) Add a spoonful of the egg white mixture and beat it in to loosen the mixture, before carefully folding in the remaining whites. Then fold in the melted chocolate and butter.


8) Pour the mixture into your prepared tin and push the quartered pears into the batter in a circular shape (as mine were so small I made two circles - one on the outside and one in the middle.)


9) Bake on the middle shelf of the preheated oven for 25-35 minutes until it starts to come away from the sides of the tin (mine took a little big longer than this - about 45 minutes as although it was cooked around the outside it wasn't in the middle - it ended being a little bit over done on the edges though.)
10) Once cooked and removed from the oven, run a palette knife around the sides of the tin and remove from the ring from the tin (but not the base.) Leave the torte to cool completely on a rack. Once cool, chill for a minimum of 2 hours before sliding off the base onto a plate.


11) Brush with the reduce pear syrup and serve (with cream if you're feeling indulgent!)


Thursday 20 February 2014

Carrot Cake


I had never made a carrot cake until yesterday - shocking I know. There were two reasons for rectifying this situation. 1) On the last day of term at school we had lots of carrots left over from the free fruit and vegetables scheme for children in Key Stage 1 so I decided to grab some (thinking I'd actually feed them to the rabbit!) so I had plenty of carrots spare and 2) One of my good friends has just discovered her 6 month old baby boy is dairy intolerant. She loves cake and is missing out so I promised her I would investigate some dairy free cake recipes. After some searching on the Internet I have discovered it is hard to find dairy free cake recipes and when you do find them they require lots of special ingredients (like dairy free spread etc.) Luckily, I came across this BBC Good Food recipe that uses oil instead of butter and uses an icing made with orange juice and icing sugar rather than the traditional cream cheese frosting you might expect to find on a carrot cake.

It's an easy recipe that only requires a couple of bowls (one for the cake and one for the icing). You will need an 18cm square cake tin, with the sides and base oiled and lined with baking parchment. (The recipe recommends using two long strips of paper crossed over making a double layer on the base.) It produces a lovely moist cake and the orange icing makes a tasty alternative topping.

Ingredients:


For the cake:
175g light muscovado sugar
175ml sunflower oil
3 large eggs (lightly beaten)
140g grated carrots (about 3 medium)
100g raisins
Grated zest of 1 large orange
175g self-raising flour
1 teaspoon bicarbonate of soda
1 teaspoon cinnamon
1/2 teaspoon grated nutmeg (I didn't have any so didn't use)

For the frosting:
175g icing sugar
1 1/2 - 2 tablespoons orange juice

Method:
1) Preheat the oven to 180C/Fan 160C /Gas 4 and prepare your cake tin.
2) Tip the sugar into a large mixing bowl, pour in the oil and add the eggs. Lightly mix with a wooden spoon. Stir in the grated carrots, raisins and orange zest.


3) Mix the flour, bicarbonate of soda and spices, then sift into the bowl. Lightly mix all the ingredients - when everything is just evenly incorporated stop mixing. (Your mixture should be fairly soft and almost runny at this point.)


4) Pour the mixture into your prepared tin and bake for 40-45 minutes, until it feels firm and springy when you press it in the centre. Cool in the tin for 5 minutes, then turn it out, peel off the paper and cool on a wire rack. (You can freeze the cake at this point.)


5) To make the frosting beat together the icing sugar and orange juice in a small bowl until smooth (you want the icing to be the consistency of single cream.)


6) Set the cake on a serving plate and drizzle the icing back and forth in diagonal lines over the top, letting it drip down the sides. (Be brave - mine looks a little splodgy and where my cake has slightly sunk in the middle the icing has pooled together - I wish I was a bit more artistic!)


7) Once the icing has set slice into pieces and enjoy!

Sunday 16 February 2014

Blueberry Muffin Loaf


Today was the baptism of the son of one of my best friends - the extremely cute Ellis. Knowing my love of baking my friend Rachael asked if I would make a cake for after the service. It was the perfect opportunity to try something new. I had some blueberries that needed using up so I decided to try out this recipe for Jo Wheatley's blueberry muffin loaf. This is a lovely, moist, fruity cake with the added bonus of a crumble topping. Jo recommends serving it warm for brunch but I think it would go down well at any time of day. The recipe comes from 'A Passion for Baking' but you can find it online here.

You will need a greased 2lb loaf tin, with the base and ends lined with a strip of buttered baking parchment.

Ingredients:


Topping
25g plain flour
20g unsalted butter (cubed)
20g caster sugar

Muffin
200g self-raising flour
1/2 teaspoon bicarbonate of soda
75g soft brown sugar
50g caster sugar
70g unsalted butter (melted)
160ml full-fat milk (I used 1% fat and it didn't seem to make any difference)
1 large egg
1 teaspoon vanilla extract
130g blueberries

Method:
1) Preheat the oven to 180C/350F/Gas 4.
2) Begin by making the crumble topping. Tip the flour, butter and sugar into a bowl and using your fingertips rub the butter into the flour until it looks like a crumble mixture.


3) Then move onto the loaf. Sieve the flour and bicarbonate soda into a bowl, add both the sugars and mix well.


4) Melt the butter, leave to cool slightly and then mix with the egg, milk and vanilla extract. Whisk the mixture until smooth.


5) Make a well in the centre of the dry ingredients and pour in the milk and egg mixture. Using a large metal spoon, fold the two mixtures together until only just combined.


6) Fold the blueberries into the mixture (make sure you don't overwork the mixture as otherwise you will get a heavy sponge).


7) Carefully spoon the mixture into your prepared loaf tin and scatter over the crumble topping. Bake on the middle shelf of your oven for about 1 hour or until golden, well risen and a skewer inserted into the middle of the cake comes out clean (mine took 50 minutes).


8) Enjoy warm or at room temperature.